mcontrol
How to use the mediola mControl Server interface to support devices in AIO CREATOR NEO which are not supported using NEOPlugins.
Purpose
The AIO CREATOR NEO software is designed to support devices using NEO-Plugins. For users which want to use devices in AIO CREATOR NEO which are not supported by NEO-Plugins, there is an option to use the mediola mControl interface and their own server application instead.
Important Note: This guide addresses software developers with advanced skills in the implementation of server applications. mediola does not assume any warranty and liability for any kind nor provides any technical support for the mControl interface and such implementations.
To connect non-NEO-Plugin supported devices into AIO CREATOT NEO and control those devices using the AIO REMOTE NEO app, you need to write your own device-server (mControl server implematation) which communicates with the mControl Server interface. The XML-based mControl interface enables your mControl server to communicate with AIO Remote NEO and pass commands and transfer status information and thus control/ monitor the devices connected to your mControl server.
For the data exchange in XML-format, a socket is used. Therefore, your m control server must be implemented in a suitable language / technology (e.g. node.js or php) to provide the logic for the communication with the mControl interface.
Once your mControl server has been implemented and running, it can be registered into AIO CREATOR NEO by assigning your mControl server as a new gateway in the AIO CREATOR NEO device manager. As a next step, all devices which are connected to your mControl server can now be integrated in the AIO CREATOR NEO device manager by adding those devices as new devices. At this stage, you can now assign the functions of the previously added devices to remote elements in the AIO CREATOR NEO as usual.
1. How to set up the mControl server interface
For the communication using the server interface in XML format a socket is used (important: port must be identical to the port of the integrated mControl server in NEO device manager). The messages must comply with the following communication rules: Any message consists of a 3-line header followed by a XML-part which contains all essential data to execute commands and transfer status.
3-line header:
While line 1 and 2 is always identical, the third line defines the length of the message (always 8 characters are required, if necessary with starting 0). Every line has to end with ‚\ n‘. Note: It is important to set the header correctly.
How to send a command
The following message (is sent by the remote) executes a command.
MCM:PLUGIN
XML
00000164
<?xml version="1.0"?>
<mctrlmessage>
<request name="ExecuteCommand" module="hcontrol">
<param name="command" value="kitchen.light.on" />
</request>
</mctrlmessage>
The param tag of the XML message contains the essential informations: name: to execute a command it must be “command” value: this is the subsystem ID, which is always composed of group and device as set in the NEO device manager and command. Once the server receives an „execute command“ message like above, it responds as follows:
XML
00000117
<?xml version="1.0"?>
<mctrlmessage>
<response>
<return name="status" value="success" />
</response>
</mctrlmessage>
Because the client (remote) only checks for a valid response and does not check for different statuses, the content of the response can always be identical.
How to read out statuses
The following message (sent by the remote) requests the statuses of devices:
MCM:PLUGIN
XML
00000236
<?xml version="1.0"?>
<mctrlmessage>
<request name="GetStates" module="hcontrol">
<param name="mcontrol.Küche:state" value="kitchen.light" />
<param name="mcontrol.Schlafzimmer:state" value="bedroom.light" />
</request>
</mctrlmessage>
The param tag of the XML message delivers the essential informations:
Name: room and device name as set in NEO device manager Value: this is the subsystem ID, which is always composed of group and device as set in the NEO device manager.
Because the statuses of a remote control page are always read out with one single message, the param tag may occur several times in the same message.
To a request message like above, the server responds as follows:
XML
00000183
<?xml version="1.0"?>
<mctrlmessage>
<response>
<return name="mcontrol.Küche:state" value="on" />
<return name="mcontrol.Schlafzimmer:state" value="50" />
</response>
</mctrlmessage>
The statuses of the requested devices are contained in this message. It is important that all the data in the return tag meet the expected conventions for name (room.device) and value.
For a simplified implementation of the protocol for demonstration purposes visit: https://github.com/mediola-connected-living/node-js-mcontrol-sample-server
2. How to integrate your mControl server and devices to AIO CREATOR NEO

- First your mcontrol server must be added as a new gateway in the NEO device manager. For this purpose open the gateway tab of the device manager, click the „add new gateway“ button, select mcontrol as type and enter ip-address and port. Finally click „save“.

2. Now you can integrate your devices. Go to the devices tab of the device manager and click „add new device“, select a room and your previously added server as gateway and enter the subsystem ID (composed of group & device) of the device. Add more devices the same way. The subsystem ID (group & device) is used by the server to identify the devices.
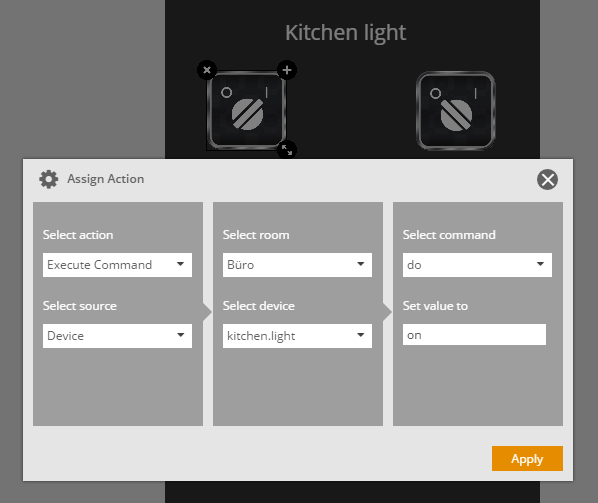
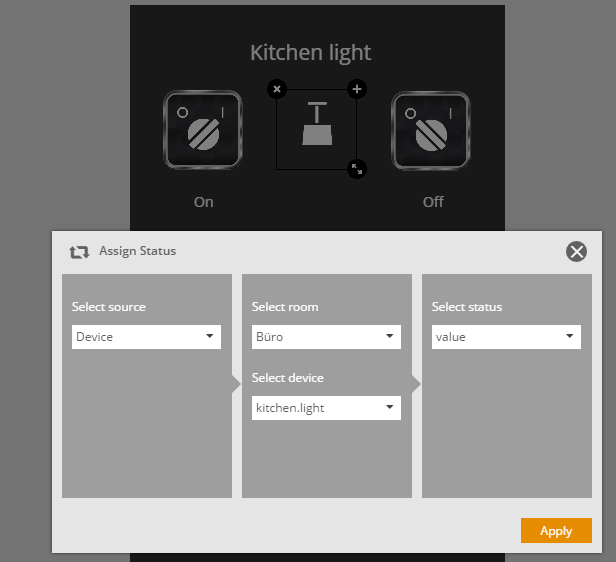
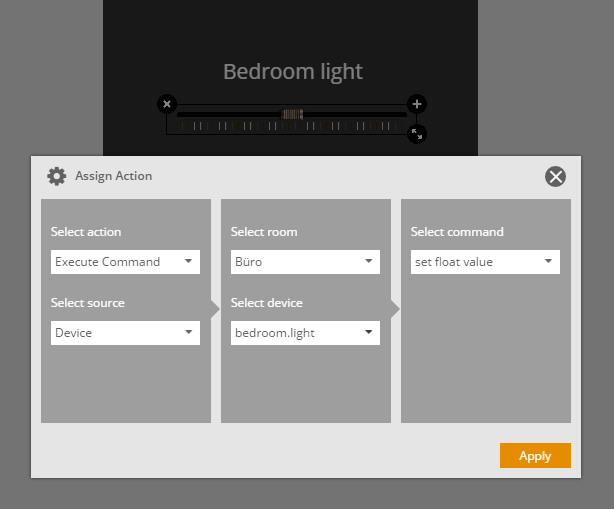
3. Integrate function into App UI
Finally, you can assign functions to remote elements in AIO CREATOR NEO to control the devices via AIO REMOTE NEO app. To assign actions to remote elements it is necessary to enter the correct commands (see images).